
Last Updated on March 19, 2020 by Dave McLean
Everyone likes fast websites. One way you can speed up your website, recommended by many website speed testing websites, is to serve images on your website from a subdomain. In this article, I’ll show you how you can do it in a few easy steps.
If you are someone that likes to optimise your websites and to make them load as fast as possible, you may have done some website speed testing. You may have used website speed tools such as Pingdom or GTmetrix, and had recommendations from them saying serve images on a subdomain. What these suggestions are trying to say is if you load all images on your website using a subdomain, such as images.davemclean.net, then your website will load faster.
If I serve images from a subdomain, how will it make my website load faster?
When a web browser loads a web page, it can only load content from up to 6 connections at a time. These connection types include subdomains. If you have all of your website content loading from the single main subdomain of your website, this will slow down the loading speed of your website.
When serving images from a subdomain, all other content on the website (JS, CSS, HTML) can be loaded using the main hostname. Since there are two channels in which your website can load its content, your website loading speed will be faster.
Another way to look at it is when a web page loads, all content gets funnelled into a single loading queue. By creating a subdomain in which to serve website images, we are creating a second queue. This helps to get all of the website content appearing on the screen faster.
Images are one of the largest pieces of web content in terms of file size. So it makes sense to prioritize the loading of image content by serving them from a subdomain over other website content. Doing so will see dramatic improvements in the loading of your website.
What are the requirements to serve images from a subdomain?
To be able to serve images from a subdomain in WordPress, you will need to have some knowledge in:
- Control Panels (or cPanel in the case of this tutorial)
- phpMyAdmin
You’ll need to have a bit of patience with this process. Setting up a subdomain and getting website content to use the subdomain requires propagation of hostname servers.
I’d also recommend doing a backup of the website before going further.
This tutorial will be using https:// in all mentioned web addresses. If your website just uses the standard http://, then change all mentions of https:// to http://.
If you are keen to learn how to serve images from a subdomain, then let’s get cracking.
Step 1: Create a subdomain
The first thing we need to do is create a subdomain. You can do this by accessing your cPanel.
Once you log in to your cPanel you need to make your way to the domains sections. Inside the domains section, there should be a subsection named subdomains. Click on this to enter the subdomains section.
The first thing you need to do on the subdomains page is type in the name of your new subdomain. In this example, I’ll use the subdomain of images.
Next, you will next need to choose a domain in which to create a subdomain for. For example, I would need to choose davemclean.net if I wanted to make a new subdomain for my website.
After that, you can set up the Document Root folder for the subdomain. This will need to be set to the uploads folder of your WordPress website. The default WordPress content uploads folder is found at public_html/wp-content/uploads.

Once you are happy with the setup of the subdomain, click create. Your subdomain will be set up shortly after. This can take a little bit of time depending on your web host but should take no longer than 30 seconds at the most.
Nice one! You have successfully set up a subdomain for your website. That wasn’t too bad, right? Now, we can move onto getting your WordPress to load any new image content to your new subdomain.
Step 2: Changing the media upload location in WordPress
The next step in the process is we need to tell WordPress to upload all new media content to the new subdomain. To do this, we need to make our way to a hidden page where this can be changed.
Log in to your WordPress website backend. When you go to your main dashboard, the URL in your web browsers should be yourwebsite.com/wp-admin. What you need to do now is add /options.php to the end of the web URL so it says yourwebsite.com/wp-admin/options.php. This will take you to a page titled All Settings.
What we need to is find and change the upload URL path, or the location in which all newly uploaded content in WordPress is uploaded to. We need to find the option named upload_url_path. If you use Windows, you can get CTRL+F on your keyboard and then type upload_url_path in the search field.

When you find this option, the field next to it should be blank. What needs to go in here is the new subdomain that we created. In my example, this will be https://images.davemclean.net. Type your subdomain in here, and then make sure click the Save Changes button at the very bottom of the page.
Nice one! All of your new WordPress uploads will now be using the new subdomain in their upload paths. Our next step is to update the URLs of the image content in the old blog posts on your website.
Step 3: Update the image path in old blog posts
How do I do this?
All new images uploaded to your WordPress website will now use the new subdomain in its URL path, which is awesome. But one thing we need to consider is the links of images in old blog posts.
You can go into each of your blog posts one by one to make this change, but that will take a lot of time to achieve. There is a quick solution that will change the URL path for all blog post images in one fell swoop. This will involve having access to your database via phpMyAdmin and making a change to the database. I’d recommend making a backup of your website if you are worried about making a database change.
It’s time to access phpMyAdmin
The typical way to access the phpMyAdmin of your website is through cPanel. When you are in the cPanel of your website, there should be a Database section. Within this section, there should be a subsection named phpMyAdmin. Give this a click, and you should be taken to the phpMyAdmin page of your WordPress website.
On the left-hand side of the page, there should be a list of databases. There may be only one database here if you just run one website. Click on the name of your database.
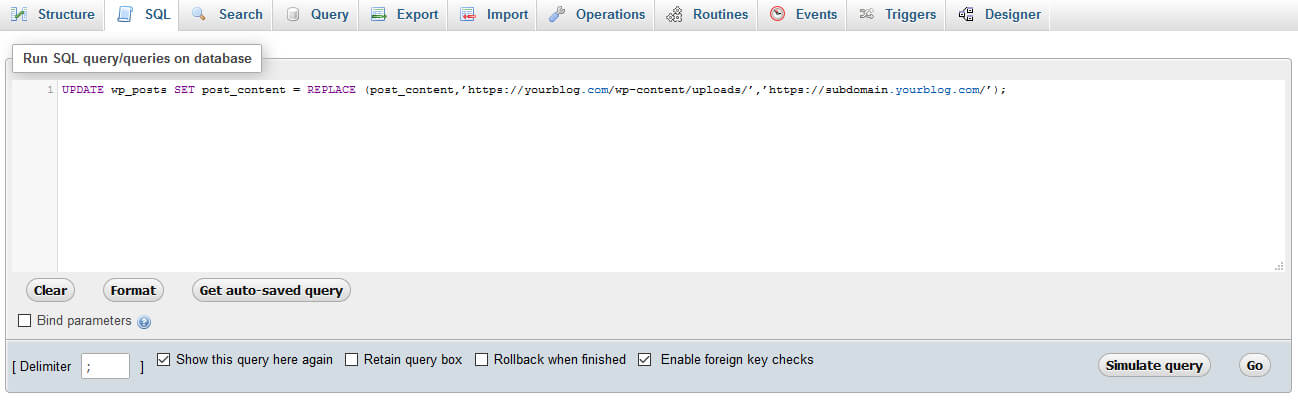
You should then see a bunch of tabs across the top of the page, with one of these being SQL. Give this table a click. What you should now see is a big empty white text area. What you need to do is make a copy of the below query and paste it into the big empty text area.
UPDATE wp_posts SET post_content = REPLACE (post_content,’https://yourblog.com/wp-content/uploads/’,’https://subdomain.yourblog.com/’);After pasting the query into the blank text field, there are two changes you want to make before submitting the database change. Change https://yourblog.com/wp-content/uploads/ to the old upload path. My example of this would be https://davemclean.net/wp-content/uploads. The other part you need to change is https://subdomain.yourblog.com/. In my example, this change will be https://images.davemclean.net/.
Take note that my example uses https:// as part of the URLs. If your website doesn’t use https:// then change this part to http://.
Once you are sure you are happy with the changes made to the query, submit the change by pressing the Go button. All of the images in your existing blog posts now use the new subdomain link in their URLs! For an example of a successful change, an image that had an URL path of https://davemclean.net/wp-content/uploads/coolimage.jpg should now be https://images.davemclean.net/coolimage.jpg. It’s much shorter, looks nicer and doesn’t show the WordPress file upload structure. That’s awesome!
There is one more step below that we need to go through to fully completely change the location in which images are served on your WordPress website. The last step is to redirect all old image paths to the new subdomain path.
Step 4: Redirecting all old image paths to the new subdomain path
The story so far
What we have basically done so far is change the location in which new files are uploaded to, and update the location of images in existing blog posts. The last thing we need to do is make sure all of the uploaded content in WordPress is accessible only via the new subdomain, and not through the old upload URL as well.
In the previous step, we updated the paths of images in old blog posts from the old URL path to the new subdomain URL path. We now need to redirect anyone that tries to go to the old URL path to the new subdomain URL path. This is good for normal users, so they don’t get confused about the image location, as well as for SEO / Google related purposes.
The .htaccess file
To complete the last step we need to make a change to the .htaccess file for your WordPress website. Since we used cPanel in the previous step, we can use cPanel again to find this file. Log in to your cPanel and make your way to the Files section. Within this section, there will be a subsection named File Manager. Click on this.
The .htaccessfile we want to change is a hidden file. In order for us to be able to see it, we will need to make File Manager show all hidden files. When clicking on File Manager earlier, a popup window may show asking if you want to show hidden files. If not, you can go to Settings in File Manager itself show make hidden files visible that way instead.

Once hidden files are visible, make your way to the root folder of your WordPress website. The .htaccess file should be visible in the root folder. Right-click on the .htaccess file and choose to edit the file. Once you are editing the file, paste the following code into the file:
RedirectMatch 301 ^/wp-content/uploads/(.*)$ https://subdomain.yourblog.com/$1Change the subdomain URL shown in the code to your subdomain. In my example, it would be https://images.davemclean.net.
If any users attempt to access images using the old path (yourblog.com/wp-content/uploads/image.jpg, for example) from now on, they will be redirected to their new location (subdomain.yourblog.com/image.jpg).
Congratulations you! You have completed all of the steps to fully serve images from a subdomain in WordPress.
To sum things up
There is a little bit of work involved to serve images from a subdomain in WordPress, but it is well worth it. Your website will improve its loading speed, the URLs for your images will look nicer and your website’s SEO will improve.
I hope that this tutorial has been useful. If there is anything that I missed out in this tutorial leave a comment in the comments section below. And as always, have fun tinkering around with WordPress and making awesome WordPress websites!
Check out some of my other WordPress tutorials and tips, and see what else you can do to improve your WordPress website.


This is the most elaborate tutorial I came across., I usually get mad at article writers for not telling to change the domains(example to actual), on the pretext, anyone who reads that article will understand by default. anyways.
Will this also work with js and css files?. Creating separate subdomain for css or js will be better?
Thank you, Senthil! It is quite a long process to serve images from a subdomain in WordPress, but it is worth it to speed up your website a little bit. I tried to be as descriptive as possible to make the process as easy as possible. I’m not 100% sure about your question regarding serving .css and .js files on a subdomain, but I think this would be quite a tricky process. All plugins, themes, and WordPress itself contain .css and .js files. These filetypes are all over the place in the file structure of the WordPress websites. I think… Read more »
Yeah, I get it bro, BTW If the wordpress images are just featured images, there’s no need to edit the database. As the media library changes all the files url to the subdomain url. The files just need to be moved to the subdomain. which is what I did.
Hi Dave, I created a new WordPress site and followed the same steps that you mentioned. Since this is a totally new site, so I followed till step 2 where I updated the options.php file. But this method is not working.
Heya Vivek. You said that you made the edit to the ‘options.php’ file. Did you follow the instructions in Step 2 and make the edits in WordPress admin, or did you actually edit the options.php file itself? I just tested out my method for Step 2 and it still works for me. Sometimes when you have just made the subdomain mentioned in Step 1 it can take a little bit of time for the subdomain to work and point to the files that are set up as part of Step 2. Maybe this was the issue? If you can give… Read more »
I searched more and found one more thing.. I have to update the the folder name in upload_path field as well. After updating the folder name in it. It started working. Thanks for the tutorial Dave..!!
[…] [2] https://davemclean.net/wordpress/serve-images-from-subdomain-in-wordpress/ […]